Types of potato hillers for a walk-behind tractor: how to make and customize with your own hands?
It is not difficult to make a disk hiller for a walk-behind tractor with your own hands. It is a multifunctional device that helps to change soil conditions, make furrows and form ridges when hilling potatoes or other vegetable crops.
Variety of choices
A walk-behind tractor or cultivator will help to facilitate planting and caring for potatoes. In the work in the garden or garden, they are considered indispensable helpers. The plow is an integral part of the walk-behind tractor. It can be reverse and disk. An additional adaptation to the technique is a hiller, which can be of several types.
It will not be possible to immediately determine which hiller is better. The choice of tillers is influenced by many factors, including the characteristics of the soil, the size of the land plot, the financial part of the issue plays an important role. Therefore, in order to make the right choice, you need to get acquainted with the description of the most common hillers for a walk-behind tractor:
- Hillers that do not involve self-adjustment of the width between the metal wings. The furrow for all crops will be the same distance, which is not very convenient. It is convenient to use such types of structures for a motor cultivator weighing no more than 30 kg. In addition, the tines of the device are thin and not suitable for cultivating hard soil.
- Equipment that involves changing the width between the wings, so the distance between the furrows can be made different. It is also possible to use two units at the same time on the same hitch. It is recommended to install it on a walk-behind tractor weighing more than 30 kg.
- The most popular type is the single-row hiller. The device is designed to work with light soil, previously treated with a cultivator. If a single row plow is used, the lugs are installed close to each other. This is necessary because the hilling is carried out one row at a time. There is a more modern two-row hiller for a walk-behind tractor.
- Another device for hilling vegetable crops is the Dutch hiller. It allows you to adjust the wings not only horizontally, but also vertically.
- The active hiller (rotary) of the propeller version is convenient to use. He has a completely different principle of work. The rotary hiller instead of wheels has rotors with parallel teeth. The device can be installed on a walk-behind tractor and a cultivator with two forward gears. Propellers mounted on the crossbar are convenient for chopping and loosening the soil, removing weeds from the roots and hilling plants.
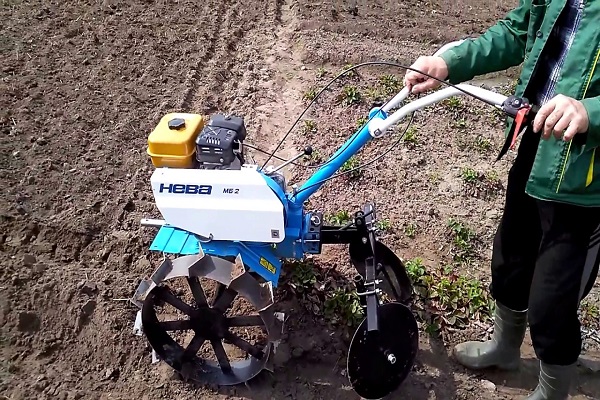
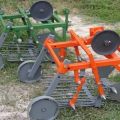
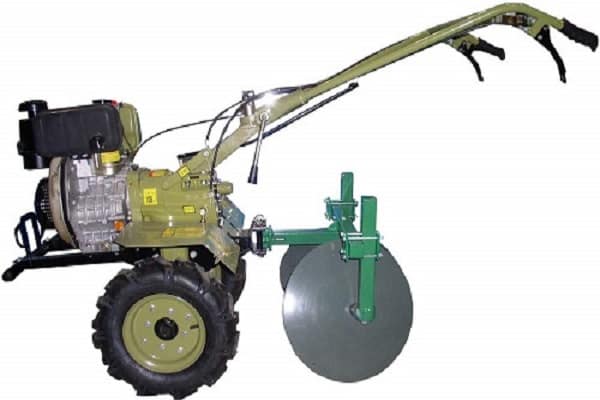
- The best, judging by the reviews of the owners of walk-behind tractors with an additional device, is considered a disc hiller for a walk-behind tractor. It consists of a T-shaped leash, screw adjusters, two posts and two discs.Work items do not look like wings, but discs. You can change not only the width, but also the angle of inclination. The result is ridges in the work area of the desired height and width.

Before starting work on your land, you need to know about the settings of the selected attachment. Improper use or installation of equipment can result in crop loss and other adverse results.
The preparatory stage is the cultivation of the desired area, it is better to loosen the soil. At the same time, organic or mineral fertilizers can be applied. The looser the soil, the easier it will be to make furrows.

Before planting potatoes with a walk-behind tractor, you need to set marks at a distance of about 65 cm. Then, furrows are made with a walk-behind tractor with a hiller and the planting material is laid out. After that, the wheels are changed to rubberized ones, and the wings of the potato hiller to the walk-behind tractor are set to the maximum width. The tiller is installed in the aisle and the plow is driven along the furrow, filling up the planted potatoes.
How to make a hiller?
A do-it-yourself potato hiller for a walk-behind tractor will not differ in functionality from a unit produced in production. It's easy to do. For work, you will need a welding machine, a grinder and a metal sheet no more than 3 mm thick. It is imperative to consider attachments for a walk-behind tractor or cultivator. The cultivator has less power than the walk-behind tractor.
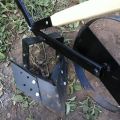
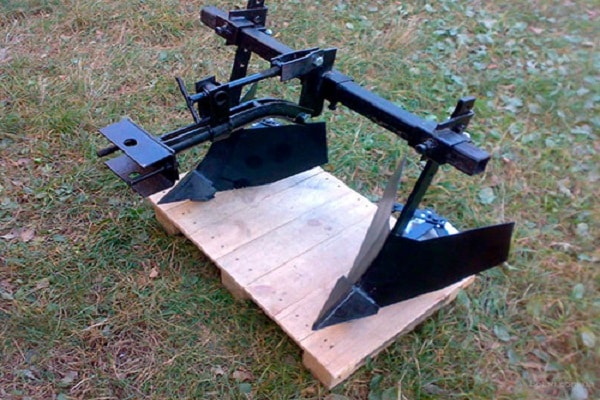
For the hiller of the lister version, a 2 mm thick metal is required on the cultivator, from which the working material will be cut - half wings. After the parts have been cut out, they need to be bent in the desired radius. In the future, the parts are welded at the fixation points. The edges are processed with a grinder.
The distance between the two half-wings is fixed with a steel crossbar. On the inside of the device, a metal pipe with several holes is welded, which allows you to install the necessary depression in the soil. Another pipe is bolted to the rack, which goes to the walk-behind tractor.
You can also make disc hillers for a walk-behind tractor with your own hands. They are a little more difficult to make than the Lister view, but with the blueprints handy, you can try.
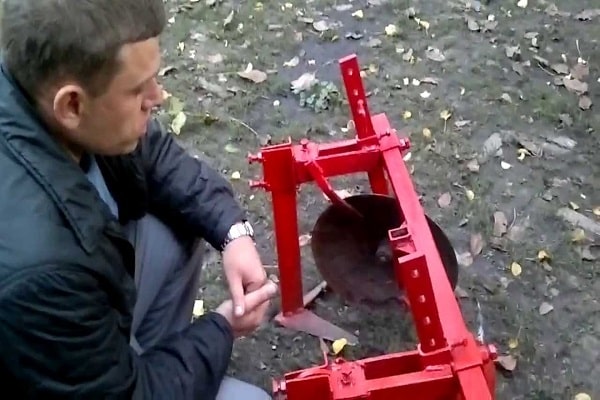
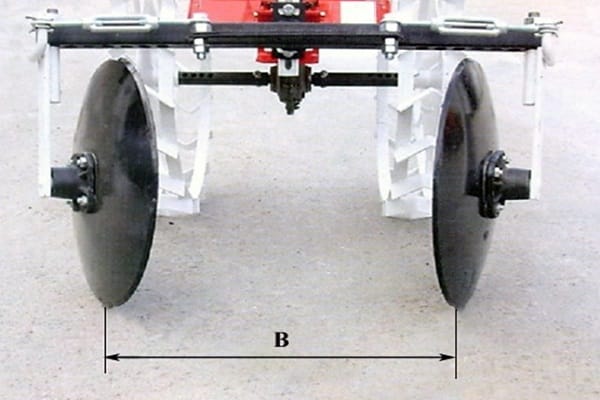
To make a homemade disc hiller, you will need to purchase two concave discs (discs from an old seeder will do). You can cut out metal plates with a width of 2 mm yourself. The diameter of the disc hiller circles must be at least 40 cm. You will also need two stands and lanyards, a leash in the shape of the letter "T".
At the desired distance, the discs are tilted to the rack with adjustable adapters by welding or bolts. Lanyards make it possible to adjust the discs vertically. When making a hiller on your own, you must make sure that the disks are installed symmetrically. Otherwise, the walk-behind tractor will skid to the side. The edges of the discs are processed with a grinder and sharpened well. The finished plow is attached to the beam, and then, using a T-shaped device, is attached to the walk-behind tractor.
A self-made disc hiller has many advantages. Any person can make it, it is enough just to find the available drawings and diagrams (you can find them in special magazines about the garden, vegetable garden or on the Internet). Do-it-yourself potato hillers will require a little cost, and the efficiency is no different from the finished apparatus.


How to set up a disk hiller?
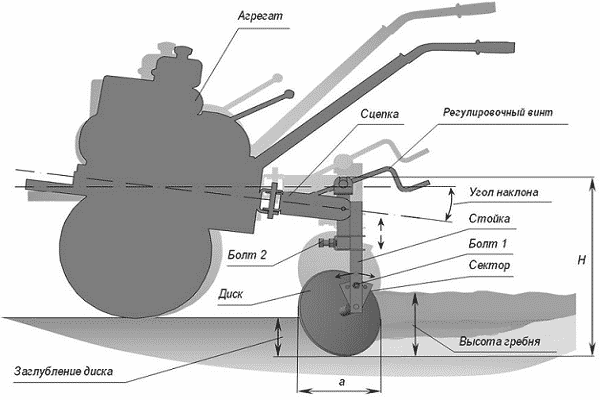
Adjusting the equipment assumes correct direction in relation to the furrow. It should be parallel to the beds on the land with a certain angle of inclination and furrow width.A good technique setting will allow you to avoid mistakes and achieve good results during work.
To set the angle, the unit has a special screw adjustment that tilts the entire device relative to the walk-behind tractor. The furrow depth depends on the part to be adjusted. In addition, the adjustment is carried out when installing the hiller to the walk-behind tractor. This is done using holes made in the rack for fasteners. If moving hillers are installed, the width and height of the ridge produced can be adjusted.
The disc hiller has a higher quality than the plow, despite the fact that it takes more time to cultivate the land. The work is carried out not on two furrows, as is the case with a two-row hiller, but with one.
It is easy to set up the disc weeding machine. The lower points of the discs are spread apart by about 40–70 cm (it all depends on the distance between the rows, the recommended width between the furrows for potatoes is 60–65 cm). When setting up the equipment, one must not forget about the angle of inclination and be sure to make sure that the discs are symmetrical to each other.
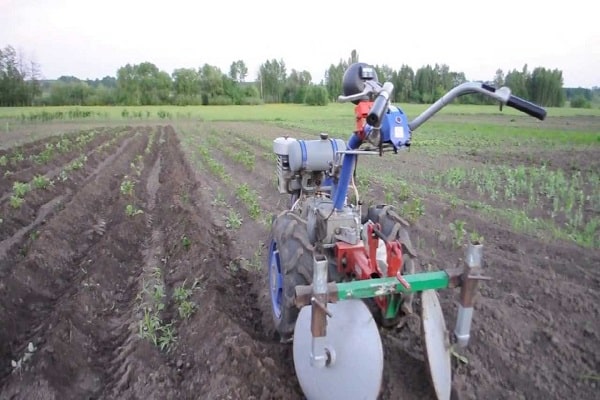
The tiller is placed in the furrows so that the processed furrow is between the working discs. Lead exactly along the aisles, without affecting the vegetable crop. The discs pick up the soil, forming a ridge, and at the same time loosen and crush large clods of soil.
For the entire period of potato growing, three potato hilling is done. The first time the work is carried out when the height of the bushes is about 16 cm, the second time when their height is about 23 cm and the last time after the end of flowering.